# How to export Lovable code to GitHub: a step-by-step guide
By [Sebastian Mertens](https://www.linkedin.com/in/auto-mate/) · October 6, 2026
To export Lovable code to GitHub, open your project settings, choose **Git**, then **GitHub**, and connect the account that should own the repository. Check that the project says **Connected** and **In sync with GitHub** before downloading or cloning it. This guide shows the settings with real screenshots, including the separate ZIP download option if you only want a copy.
## Choose GitHub sync or a code download
Start with what you want to do with the code. If you plan to keep building, hand the project to a developer, or connect it to a host, use GitHub. The **Git** settings describe a connection that carries changes between Lovable and your repository in both directions.
If you only want to inspect the files or save a snapshot, use **Download codebase** instead. A ZIP is convenient to open and share, but it does not give that folder an ongoing connection to your Lovable project. Keep this distinction in mind when someone asks you to “export”: they may mean a download, a repository, or a complete move to another host.
You need access to the Lovable project and the GitHub account you intend to use. Decide whether the repository belongs in your personal account or your team's organization before starting. That makes the account selection easier to check later.
## Step one: open Lovable project settings
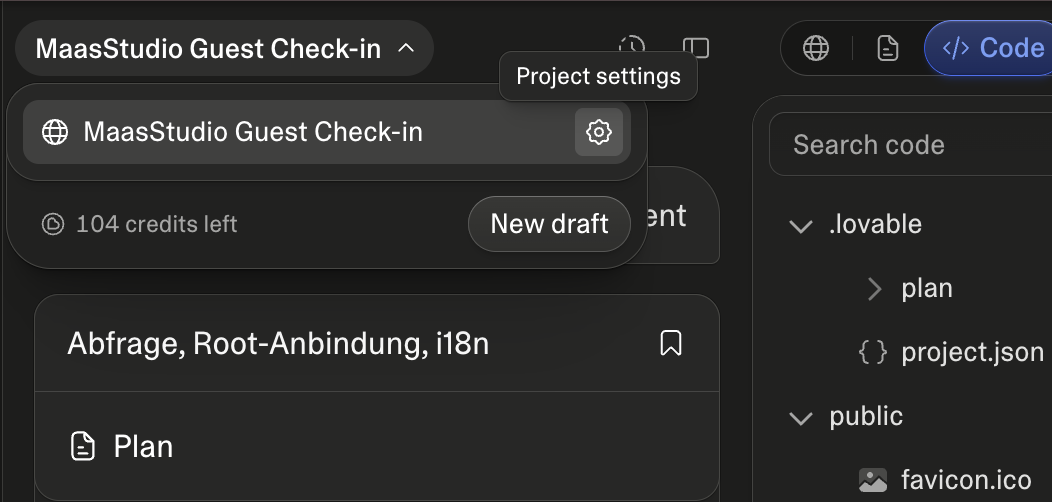
Open the project you want to export. At the top left, click the project name to expand its menu. Click the gear beside the project name; the tooltip in the screenshot calls it **Project settings**.
Open the project menu, then click the gear beside its name.
Select any screenshot to open it at full size. Check the project name before continuing, particularly if you have several similar prototypes. You are opening settings for this project, so the repository you create will contain this project's code. The **Code** tab visible in the screenshot is useful for browsing files; the gear is the route used in this guide.
## Step two: choose Settings → Git → GitHub
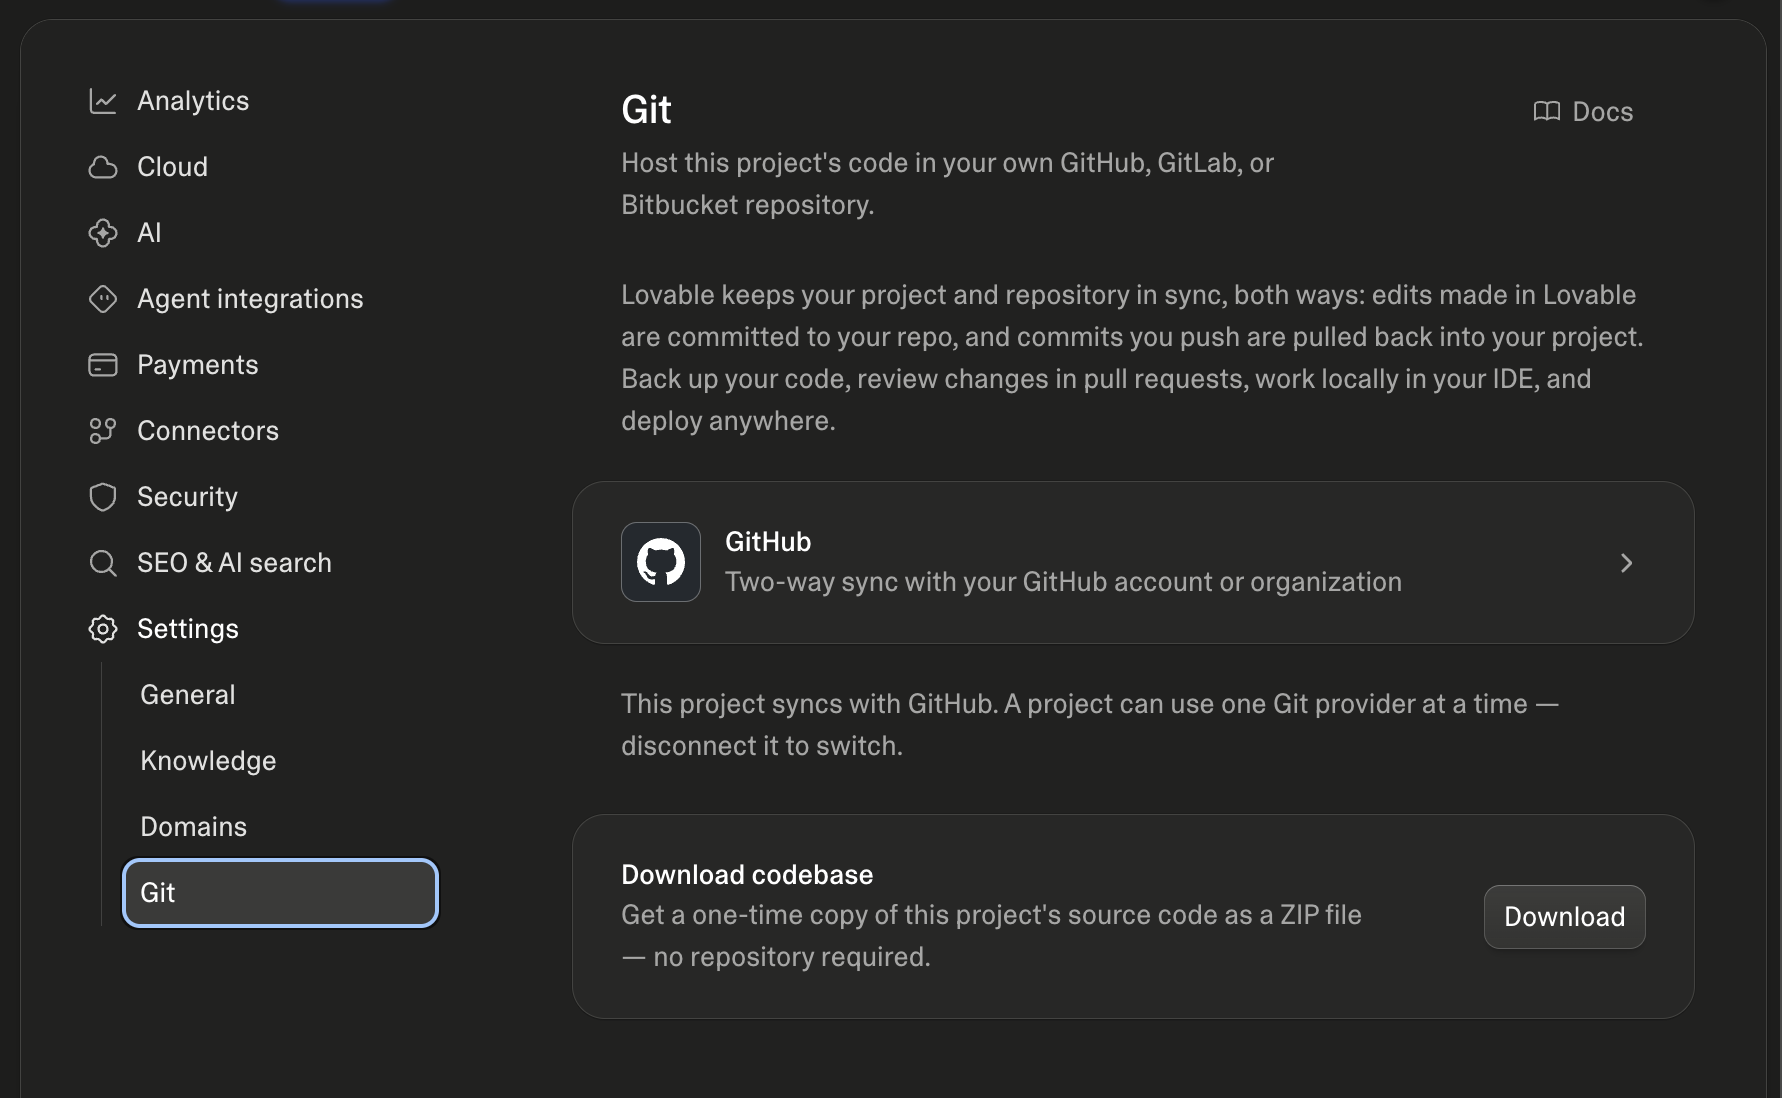
In the settings sidebar, find **Settings**, then select **Git**. You should see a Git provider card and a **Download codebase** section. Click the **GitHub** card to open its connection settings.
The Git screen contains both the GitHub connection and the separate ZIP download.
This screenshot comes from a project that already syncs with GitHub. It shows where to open the GitHub settings, rather than the initial authorization screen. If your account has never been connected, complete the setup below before looking for the connected status.
The text beneath the card also explains that a project uses a Git provider at a time. If your screen shows another provider, check the current setup before changing it. For an existing team project, ask whoever manages its repository which account and connection to use.
## Step three: authorize GitHub and connect the project
For first-time setup, a workspace owner or admin opens **Workspace settings → Git → GitHub → Add connection**. Choose **Add account**, select your GitHub account or organization, and finish **Install & Authorize** in GitHub. If a connection already exists, use it.
Back in **Project settings → Git → GitHub**, a workspace or project owner or admin selects **Connect** beside the desired account. Lovable creates a new repository, private by default. You do not need to create an empty repository first. These are the setup steps in [Lovable's GitHub documentation](https://docs.lovable.dev/integrations/github), checked October 6, 2026.
Before approving, read the GitHub account or organization name. A personal prototype and a client project may belong in different places. Once you return to Lovable, check the repository owner displayed in the connection screen against that choice.
## Step four: verify the repository and sync status
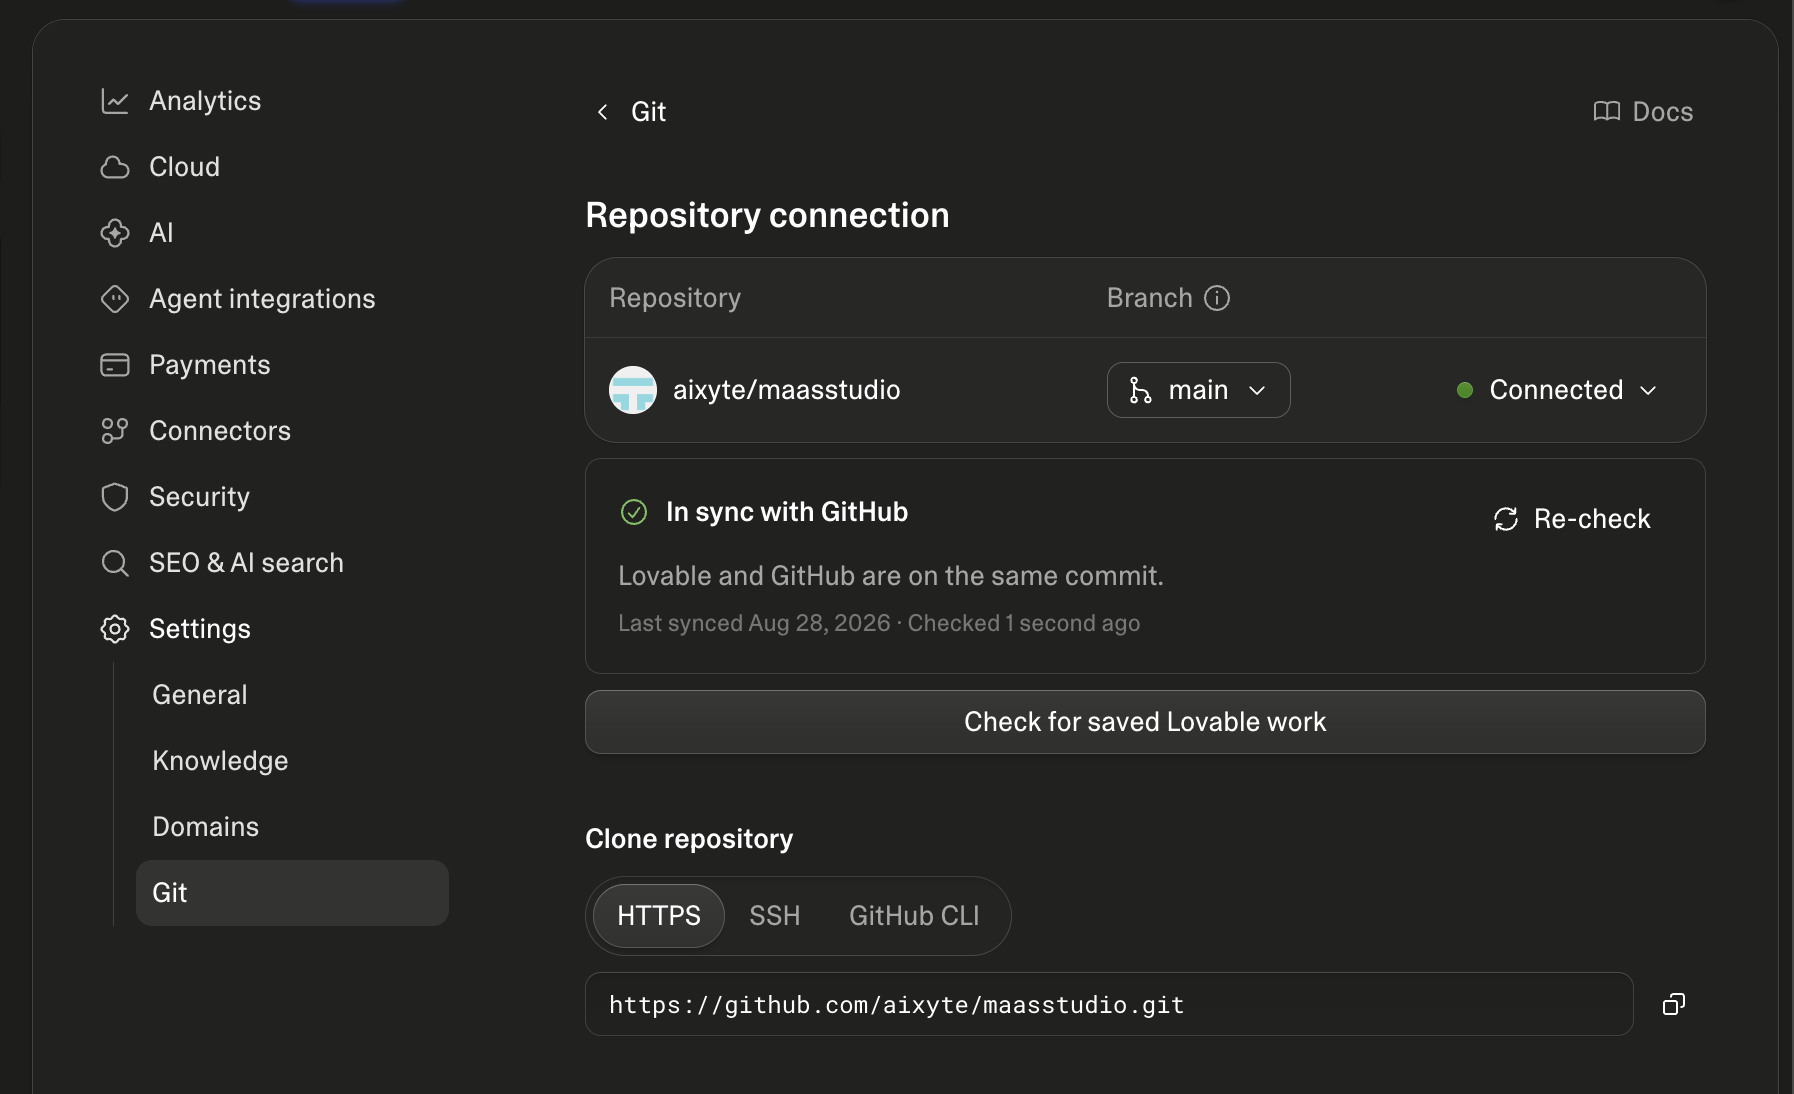
A connected project should show the repository name, a **Branch** picker, and **Connected**. The screenshot below also shows **In sync with GitHub** and explains that Lovable and GitHub are on the same commit.
Check the repository, branch and in-sync status before taking a local copy.
The example has `main` selected. Your branch may have another name. Lovable syncs the active branch; work pushed to another branch appears after you merge it or select that branch. **Re-check** checks the status again; it does not trigger a sync. See [Lovable's Git sync overview](https://docs.lovable.dev/integrations/git-sync-overview), checked October 6, 2026.
Open the repository on GitHub and inspect the file list. Look for your project files and `package.json`, then compare a recent change with what you see in Lovable's editor. This is a useful completion check: an account authorization alone does not prove that you have exported the intended project.
## Step five: clone your Lovable code to your computer
Below the connection status, **Clone repository** offers **HTTPS**, **SSH**, and **GitHub CLI**. Use the copy button beside your own repository's address. The address in the screenshot belongs to the example project.
For HTTPS, open a terminal in the folder where you keep projects and run:
```bash
git clone https://github.com/YOUR-ACCOUNT/YOUR-REPOSITORY.git
cd YOUR-REPOSITORY
```
Replace the example address with the copied URL. A clone creates a local copy with Git history, which lets you commit changes and push them back. Access to a private repository requires GitHub authentication; use the sign-in method your Git client supports. [GitHub's cloning guide](https://docs.github.com/en/repositories/creating-and-managing-repositories/cloning-a-repository) covers HTTPS, SSH and GitHub CLI.
Open the resulting folder in your editor or coding agent. Read its README and `package.json` to find the install and start commands. Follow the package manager named by the project rather than copying commands from an unrelated tutorial. Keep your first local change small so you can review what your editor changed before pushing it.
## How to download Lovable code without GitHub
Return to **Project settings → Git** and find **Download codebase**, shown in the second screenshot. Click **Download**, then extract the ZIP and open the resulting folder. You do not need a repository for this route. Lovable documents direct code downloads for paid plans in its [Git sync overview](https://docs.lovable.dev/integrations/git-sync-overview), checked October 6, 2026.
Name the extracted folder so you can recognize which project and snapshot it contains. If you download again later, keep the folders distinct until you have compared them. Editing an extracted ZIP does not send those changes back to Lovable automatically.
## If the Lovable GitHub connection is not working
- **No GitHub connections available:** return to the workspace connection setup and check the selected account with the workspace owner or admin.
- **Authorization never opens:** check whether your browser blocked the GitHub popup, then try again. Lovable lists this in its [GitHub troubleshooting](https://docs.lovable.dev/integrations/github#troubleshooting).
- **The repository opens, but a change is missing:** compare the branch names and latest commit before downloading again.
- **Saved Lovable work needs recovery:** the connection screen includes **Check for saved Lovable work**. Review any offered recovery with the project owner; it is separate from checking sync status. [Lovable's recovery instructions](https://docs.lovable.dev/integrations/git-sync-overview#restore-lovable-work-after-a-push-replaces-it) explain the choices.
Write down the exact message and repository name if you need help. “Connected but showing an older change on this branch” gives a teammate much more to work with than “export failed.”
## FAQ
### Does Lovable give you source code?
Yes. The GitHub route gives you the project files in a repository, and **Download codebase** gives you a ZIP snapshot. Check the exported files before handing them to your developer.
### Can I connect an existing GitHub project to Lovable?
The Git sync flow creates a new repository; importing an existing repository is unsupported. Export your Lovable project first. [Lovable's GitHub limitations](https://docs.lovable.dev/integrations/github#limitations), checked October 6, 2026.
### Does exporting also move my database and live website?
No. The repository contains code, not database records, and syncing changes does not publish the live site. [Lovable's Git sync FAQ](https://docs.lovable.dev/integrations/git-sync-overview#faq) separates these steps.
## Now host your Lovable app for free on ohmyho.st
Your code is in GitHub. Now give your app a live URL. Open the repository in Claude Code, Codex or Cursor and let your agent deploy it to ohmyho.st. You can keep building in Lovable while hosting from the same repository.
Start on the [Free plan](/pricing) with 200 credits per UTC month. Builds and app usage draw from that balance; your agent's deployment plan shows what your app needs before you publish.
Paste this into your coding agent with the repository open:
```text
Read https://ohmyho.st/llms.txt and https://ohmyho.st/skills/ohmyhost-get-started/SKILL.md. Connect this agent to ohmyho.st and deploy this GitHub project using only the capabilities it needs. After signing in, use the user and organization that whoami reports; never guess an account, organization or project ID. Follow the deployment Skill, keep my existing project decisions and verify the app.
```
Follow [How to host a Lovable app after export](/blog/host-a-lovable-app-after-export) for the full hosting walkthrough. To continue development with your own coding agent, see [A Lovable alternative with your own LLM](/blog/lovable-alternative-bring-your-own-llm).